The Anatomy of a Kitchen Drain Assembly (Unclog Your Sink)
One key concern about sinks in the kitchen is leaking or draining. Since the kitchen is the key room to cook food, any dirty water around spoils the things around it. You would never like to fix a leaking system under the sink while cooking recipes.
The anatomy of a kitchen drain assembly includes several key components. First, you’ve got the sink strainer, which catches food scraps. Next, the drain pipe connects the sink to the waste system. The P-trap traps water to block odors from the sewer, while the vent pipe guarantees proper airflow for smooth drainage. Regular maintenance helps keep everything working efficiently. If you’re curious about how these parts function together, keep exploring further details!
The Sink Strainer: The First Line of Defense
The sink strainer serves as your kitchen’s essential gatekeeper, preventing food scraps and debris from clogging your drain. It fits snugly over the drain opening, capturing particles while allowing water to flow freely.
Regularly cleaning the strainer is vital; otherwise, it can become a breeding ground for bacteria and odors. When you notice buildup, just remove it, rinse it off, and replace it.
Choosing the right strainer, whether mesh or solid, can also impact your kitchen’s efficiency. By maintaining this simple device, you’ll protect your plumbing and guarantee your sink continues to function smoothly.
The Drain Pipe: Connecting the Sink to the Waste System
Connecting your sink to the waste system, the drain pipe plays an important role in your kitchen’s plumbing.
It’s typically made from durable materials like PVC or metal, designed to handle the flow of wastewater efficiently.
You’ll notice that the drain pipe runs at a slight angle, allowing gravity to help direct waste away from your sink.
Proper installation is vital; any leaks can lead to water damage and unpleasant odors.
Regularly check for clogs and verify the connections are secure.
The P-Trap: Preventing Unpleasant Odors
While you mightn’t think about it often, the P-trap plays an essential role in keeping your kitchen smelling fresh. This curved section of pipe traps a small amount of water, creating a seal that prevents sewer gases from escaping into your home.
When you run water down the sink, it fills the P-trap, ensuring that unpleasant odors stay out. If your kitchen starts smelling bad, check the P-trap; it might be dry due to infrequent use.
Regularly running water through your sink helps maintain that important water barrier, keeping your kitchen a pleasant place to cook and gather.
The Vent Pipe: Ensuring Proper Airflow
A well-functioning vent pipe is essential for maintaining proper airflow in your kitchen drain system. It helps equalize pressure within the pipes, allowing water to flow smoothly.
Without adequate ventilation, you might experience slow drainage or gurgling sounds, which indicate trapped air. The vent pipe connects to the main drainage system, extending through your roof, allowing fresh air to enter and facilitating the escape of sewer gases.
This not only guarantees your drain operates efficiently but also prevents unpleasant odors from seeping back into your kitchen.
Knowing the System Under Sink
The system’s basics are that it allows water to pass through the sink into the pipes and then enter the trap area at the bottom.
The trap area fills up high enough for the water to return out the back of the drain and into the remainder of the system. The water then flows out to the street into the sewer system. Water needs to stay in there, so it’s a good thing. It keeps the sewer gases, methane gases, and other pollutants from working their way back up through the pipes.
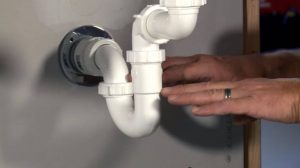
To the next, it gets out of your sink and into your home, where you might smell them, and there’s some risk there. So you want to make sure that it has a trap. That trap is definitely a good thing.
FITTING OF KITCHEN SINK DRAIN ASSEMBLY
All of the fittings where you see those nuts are compression fittings for plastic. They operate very simply.
They include a nut with a small plastic washer inside, which is slid over the pipe. If you slide the pipes together, the nut compresses against the body of the tubing and creates a seal.
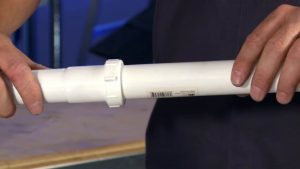
If there are any shortcut pipes or anything like that, any sort of impact while working under your sink could dislodge something, and it might be just as simple as moving the nut, putting the gasket back in a good place, and getting it taken care of that way. So, that’s the basics of how the kitchen sink drain system works through its kit. You can see some great kitchen sink drain kits online, here.
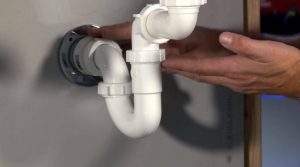
Assembling Drain Pipe Under the Sink
Here, I’m describing drain pipes for a sink, starting with an opening that receives them. This is called the sanitary tee or the drain pipe tee.
To plumb this sink drain, you may have to purchase a small segment of PVC pipe that will fit into the drainpipe tee; this is also called the stub out.
Things You Need
- A Marvel Connector
- A P-Trap Kit
- A Tailpiece Extension
- A Pair of Unions of Certain Segments (With Beveled Washers)
- A Nut (To tighten the Unions, included in P-trap Kit)
- Assembling the Drain
STEP BY STEP GUIDE
- Gather the pieces and assemble them without gluing or tightening. Do this to ensure they will all fit. Starting with a drain tee in the wall, fit the PVC segment into place, creating the stub out.
- Finish the stub out by adding the Marvel connector to the end. Now, prepare the trap arm that comes with a P-trap Kit.
- Slide one of the nuts with the threads facing the down end, and then slide another nut on where the threads facing the opposite end.
- Now, at a washer, make sure the taper is toward the end, then fit it into the marble connector loosely without tightening the nut.
- Next, attach the p-trap to the trap arm and loosely thread these connections into place. Take a nut with the threads facing down, slide it up the tailpiece on the sink drain, and hold the nut in place.
- Choose the proper-sized washer and slide it onto the sink’s tailpiece. Ensure the taper is facing down. Now, take the tailpiece extension and slide a nut on with the threads facing the end.
- Now, at a washer, again, make sure the taper is towards the end. Now move the p-trap aside and slide the tailpiece extension over the sink tailpiece in this manner, then loosely secure it in place.
- Finally, connect the bottom of the tailpiece extension to the P-trap and inspect the fit of each piece to ensure that no modifications are needed.
- In some cases, the tailpiece extension and trap arm need to be cut to size. In this situation, the pieces all fit perfectly; they can now be disassembled and permanently attached. To do so, obtain PVC cement and apply it to the inside of the drain tee opening.
- Do the same to the end of the stub-out pipe. Assemble it into place and give it a quarter turn to spread the cement. Repeat this process with the inside of the marble connector and the outside end of the stub-out.
- Now, reassemble everything else, only this time wrap the threads with Teflon tape. It only takes a few wraps around the threads—just enough to give it a reliable seal when turning the nuts. Hand tighten each nut until snug.
- Once wrapped and connected, tighten each union using channel-lock pliers. Do not overtighten, you can ruin the threads.
- If the water lines are connected, turn the water on, fill the sink, and drain while watching for leaks. Repeat this test several times. Once satisfied that the connections are sealed, the sink can now be used.
Meanwhile, following this guide to fix the broken pipe under the sink, you may need a kitchen sink drain stopper easily available near your store. However, I recommend checking out high-rated sink drain parts online.
Maintenance Tips for a Healthy Drain Assembly
Regular maintenance is key to keeping your kitchen drain assembly in top shape.
Start by flushing the drain with hot water weekly to break down grease buildup. Use a mixture of baking soda and vinegar monthly to eliminate odors and clear minor clogs.
Avoid pouring fats, oils, and food scraps down the drain, as these can lead to blockages. Invest in a drain strainer to catch larger debris.
Finally, inspect your assembly for leaks or corrosion every few months and address any issues promptly.
Following these simple steps will help guarantee your drain works efficiently for years to come.
What Materials Are Commonly Used in Kitchen Drain Assemblies?
When you’re selecting materials for kitchen drain assemblies, you’ll often find stainless steel, PVC, and brass.
Each material offers durability and corrosion resistance, ensuring a reliable and efficient drainage system for your kitchen.
How Do I Know if My Drain Assembly Needs Replacing?
You’ll know your drain assembly needs replacing if you notice persistent leaks, slow drainage, or visible corrosion.
Don’t ignore these signs; addressing them early can prevent more significant plumbing issues.
Can I Install a Kitchen Drain Assembly Myself?
Yes, you can install a kitchen drain assembly yourself!
Just gather the necessary tools, follow the instructions carefully, and make certain all connections are secure.
It’s a manageable DIY project with some patience and attention to detail.
What Tools Are Needed for Drain Assembly Installation?
To install a drain assembly, you’ll need a few essential tools: a pipe wrench, adjustable pliers, a screwdriver, plumber’s tape, and a bucket.
These will help you effectively and efficiently complete the installation process.
Are There Eco-Friendly Options for Kitchen Drain Assemblies?
Yes, there are eco-friendly options for kitchen drain assemblies.
You can choose materials like recycled metals or biodegradable plastics.
These alternatives reduce environmental impact while maintaining functionality, ensuring you make a sustainable choice for your kitchen.
Understanding your kitchen drain assembly is essential for keeping everything running smoothly. From the sink strainer to the vent pipe, each component plays a crucial role in preventing clogs and odors. By staying on top of maintenance, you can ensure your kitchen remains a clean and efficient space. So, take a moment to inspect your drain assembly regularly—it’ll save you time and hassle down the line, keeping your kitchen a pleasant place to cook and enjoy.
Meet Khadija Sheikh, an avid kitchen specialist with a passion for exploring innovative kitchen gadgets, cooking tools, and remodeling tips. Her culinary journey is an artistry of flavors, where she uniquely combines her love for kitchen intricacies with a special focus on crafting meticulous step-by-step recipes. As a dedicated writer, Khadija not only unveils the secrets behind delightful dishes but also transforms kitchens into creative spaces. Join her a flavorful adventure, where every recipe becomes a narrative, and every kitchen tool tells a story.